OpenEdge Installation Unix/Linux
- Rajesh S Nair

- May 15, 2018
- 3 min read
Now after going through the concepts involved in a OE Database architecture.
Let us start with the first and foremost activity which a progress DBA is likely to undertake to proceed further.
These steps are as per unix/solaris installation.
Installation Steps for Progress OpenEdge Product:
Pre-requisite: DBA to make sure Java and apache already installed and we have progress Setup(installation pack), Root access
Login to server and switch to root user, you always should be in /tmp directory to install the progress Open edge.
~#cd /tmp /tmp#/installation/path/directory/proinst when you hit above command you will be directed to below screen where it check the JVM and lets you select the required version. It is must that JVM should be installed in your machine where you going to install progress Open-edge, usually progress consultants will always prefer java 1.5 for 10.2b and 1.6 above for 11.x. You can check which java version is installed in your server by hitting command java -version. 1.Welcome screen of installation.

hope you agree for the copyrights hit enter.
2. Information required are,1. company name (which is owning the license)2. serial number3. control number

you can enter multiple licenses by hitting Enter company name will remain same serial and control number will varies. Once you done with entering all the licenses hit ctrl + E. it will prompt you to ask whether you have done entering all licenses hit y.
3.Next screen which appears is below.
Open Edge Explorer functionality is provided within the browser interface for the OpenEdge Management.
When the Admin Server is running, a web browser such as Internet Explorer or FireFox may be directed to http://localhost:9090 (the default location of the OpenEdge Management / Explorer connection).

hit “y” if you have installed openedge app svr enterprise license.
4. if you hit “Y” you will be directed to below screen

Here you have to give JAVAHOME path which will be $JAVA_HOME environment variable. hit enter to next screen.
5. Below screen will ask 3 important things,1. Type of installation· complete install· Custom install select complete install which will install the entire package which comes under it.2. Destination path name· Here you have to put destination of the open edge which will be $DLC and work directory destination.3. Management Path name· Here you have to put the management path and work directory management.

Once you complete entering all the directory hit enter when marker is on continue with installation.
6. Next screen will be Sonic ESB installation.

Sonic ESB is an enterprise service bus (ESB) which simplifies the integration and flexible reuse of business components using a standards-based, service-oriented architecture (SOA). Sonic ESB connects, mediates, and controls services, wherever they are deployed and eliminates hard-wired service dependencies. Sonic ESB provides fast, dependable and secure communications and transactional failover of service interactions. Sonic ESB operates across domains, physical networks, and corporate boundaries.
We don’t need it in standard installation hit “N”.
7. Next screen which appears is

It allows you to build applications that use HTML, XML, WML, DHTML, and most other mark-up languages (MLs) as the user interface.
8. hit y enter to next screen where you need to provide some configuration for webspeed.

9. This screen will asks for 3 steps1. Type of web speed· sun webserver· CGI -compatible (always prefer this apache needs CGI compatible works on all machine)2. Select web-server script directory· enter the cgi-bin directory path of apache directory· /path/to/apache2/cgi-bin3. copy static HTML· Enter the same path which you have mentioned above.Continue with installation hit enter. Next section will be language selection section. Hit enter to select and enter to proceed next screen, you can select as many language you want. After that next screen which appears is settings for languages.1. character setting, collation, case setting· select American, united states,IS08859-1,basic,basic (if you selected English -American in prev screen)2. Select date format (according to your company standard).3. Select number format (according to your company standard).Continue with installation. 10. Web speed adapter URL you can change if you want.

11. Hit enter to next screen.

You can hit y only if you need it if not press N,You can also enable it once complete the installation also. 12. Here comes the screen before installation which will brief your product details which you going to install
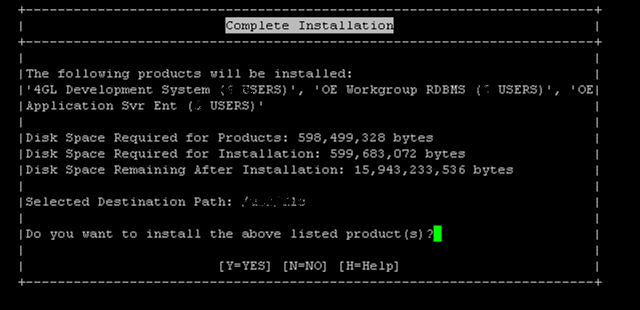
13. Hit y to proceed.

14. Once installation completes below screen will appear.

15. Hit enter

This will be last screen of installation. Enjoy the facilities of progress open edge.


Comments